|
1971 Katama-Sakonnet Conversion 95% complete
|
| charkbait |
Posted on 04/10/09 - 5:28 PM
|
Member
Posts: 82
Comments:
0
Joined: 08/01/08
|
I'll add to my personal page and build out the detail on what I did this week but here are some pics and a link to the project album on photobucket
http://s385.photobucket.com/albums/oo...r%20Rehab/
[IMG]http://i385.photobucket.com/albums/oo298/charkbait/Whaler%20Rehab/DSCF0491.jpg[/IMG]
[IMG]http://i385.photobucket.com/albums/oo298/charkbait/Whaler%20Rehab/DSCN0515.jpg[/IMG]
Edited by charkbait on 04/10/09 - 5:28 PM |
| |
|
|
| charkbait |
Posted on 04/10/09 - 6:06 PM
|
Member
Posts: 82
Comments:
0
Joined: 08/01/08
|
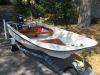
Started the project around christmas with the intent to have it finished up and out of the garage by March. My wife it very sensitive to fumes so I was banished to the outdoors when painting etc so it took a good bit longer then I had hoped. Anyhow here are the specs.
I acquired a 1971 Katama in the fall with a running 115hp, good hull, and decent trailer for $1300 off craigslist. I immediately sold and swapped the unknown motor for an 88SPL that I had much more confidence in, the ultimate goal being a re-power in the next 2 years. I fished it and beat it up in the fall deciding what to do with the interior. I surf fish barrier islands so my boat had to be tough due to the gear we carry but also versatile enough to fish the spring striper run on the northern Chesapeake. I also noticed that I nor anyone else ever sat on the RPS...easy decision to yank that and not replace it. The Sakonnet layout was an obvious selection for versatility, storage, redistribution of load, and fishing off the bow. I also liked the idea of a rear casting deck and decided on the stern box as well. Now that I knew what I wanted I could start.
It wasn't much of a boat but it was mine.
http://s385.photobucket.com/albums/oo...r%20Rehab/
EDIT:
The above link is all we need to view all of your photos.
Thanks
Edited by Joe Kriz on 04/10/09 - 6:11 PM |
| |
|
|
| Joe Kriz |
Posted on 04/10/09 - 6:09 PM
|

Site Owner
Personal Page
Personal Album
Photo Albums
Project Albums
Posts: 11434
Comments:
452
Joined: 03/18/05
|
PLEASE......
NO outside photo hosting links...
Please start a personal page or a project album here on WhalerCentral.
The forums is NOT the place to post unlimited amounts of photos.
Only 1 or 2 to get your point across.
Thanks
|
| |
|
|
| charkbait |
Posted on 04/10/09 - 6:12 PM
|
Member
Posts: 82
Comments:
0
Joined: 08/01/08
|
charkbait wrote:
Started the project around christmas with the intent to have it finished up and out of the garage by March. My wife it very sensitive to fumes so I was banished to the outdoors when painting etc so it took a good bit longer then I had hoped. Anyhow here are the specs.
I acquired a 1971 Katama in the fall with a running 115hp, good hull, and decent trailer for $1300 off craigslist. I immediately sold and swapped the unknown motor for an 88SPL that I had much more confidence in, the ultimate goal being a re-power in the next 2 years. I fished it and beat it up in the fall deciding what to do with the interior. I surf fish barrier islands so my boat had to be tough due to the gear we carry but also versatile enough to fish the spring striper run on the northern Chesapeake. I also noticed that I nor anyone else ever sat on the RPS...easy decision to yank that and not replace it. The Sakonnet layout was an obvious selection for versatility, storage, redistribution of load, and fishing off the bow. I also liked the idea of a rear casting deck and decided on the stern box as well. Now that I knew what I wanted I could start.
It wasn't much of a boat but it was mine.
http://s385.photobucket.com/albums/oo...r%20Rehab/
EDIT:
The above link is all we need to view all of your photos.
Thanks
sorry Joe, I'll blow up the rest!
|
| |
|
|
| ioptfm |
Posted on 04/10/09 - 6:14 PM
|
Member
Personal Page
Posts: 1533
Comments:
3
Joined: 10/28/06
|
WOW! She looks fantastic...............Did you all of the wood yourself? It looks great adn I agree that the rear casting deck not only looks good, but is very practical......Good Job! 
Tom
1979 Sport 15' |
| |
|
|
| Joe Kriz |
Posted on 04/10/09 - 6:15 PM
|
Site Owner
Personal Page
Personal Album
Photo Albums
Project Albums
Posts: 11434
Comments:
452
Joined: 03/18/05
|
Thanks charkbait.
There is a thread about this:
http://www.whalercentral.com/forum/vi...ad_id=5359
And the Code of Conduct also talks about "Images"...
http://www.whalercentral.com/viewpage...age_id=118
I put one photo in your personal page for you.
Give it a try.
Photos are to be no larger than 640x480 in the personal page section.
Edited by Joe Kriz on 04/10/09 - 6:19 PM |
| |
|
|
| charkbait |
Posted on 04/10/09 - 6:30 PM
|
Member
Posts: 82
Comments:
0
Joined: 08/01/08
|
Anyhow folks, check out the link.
I decided on durabak for the interior due to the ruggedness of the coating and the gear I carry to surf fish the islands. Metal sand spikes, beach carts, chairs etc. Real damaging on a coat of paint of gel. I think it turned out great, only time will tell in terms of durability but other folks have had success. For anyone interested it takes about 2.5 gallons to sufficiently cover a classic 17'
After the durabak was in I got a group of 6 to help me flip the boat and everything went smoothly. I just stacked 2x4's on top of the trailer frame and rested the hull on those. After sanding bottom paint, filling every ding and dent I decided I would not spend another week filling and fairing something I would never see and moved forward with sealing and painting. I did however spend a great deal of time on the sides of the hull. They look great to everyone but me since i know where all the little skeletons are.
I did all of the through hulls with 3/4 PVC and 5200'd them in, after a week I sanded them flush, hope to never worry about them again.
For the hull I did 6 or so coats of interprotect to seal her up, this was a huge PITA in the winter trying to find the right days and optimal temps to apply. I rolled everything. I did the rest of the hull with...ready...wait for it...rustoleum topside marine paint for about 10% of the cost of gel or awlgrip and the like. It looks awesome and should get me 5 or so years, 345 days a year the boat is on a trailer in my garage. I talked to a lot of people on this one and am comfortable with the decision I made. Again, only time will tell. Maybe funds will be available for a pro gel job when 'next time' comes around. For now it looks great and no one would be the wiser.
You'll also notice a beige keel guard I put on, this is durabak without the non-skid...I have no idea if this will work or not. As a side note I took a chunk out of it as soon as I snugged it up to the trailer winch...DOH! Should have replaced that roller!
Edited by charkbait on 04/10/09 - 7:29 PM |
| |
|
|
| charkbait |
Posted on 04/10/09 - 6:45 PM
|
Member
Posts: 82
Comments:
0
Joined: 08/01/08
|
On to the W O O D.
CONSOLE
I bought a console out of a 1960's whaler on ebay for just over $100 and it was local. I was able to get the RPS seat back from the guy too, this was sometime last fall in anticipation of the rehab. I sold the RPS back and was able to fund some extra stuff. Anyway I had the console I needed in the mix, glass, gaskets, etc. Only problem was the 45 holes in the top from fish finders, compasses, radios etc over the past 40 years. Also I had to go VERY deep on my sanding in places to get decent wood. Overall the console refinishing didn't go spectacular but it turned out good enough to make me proud of rescuing the old console and get a couple years on the boat before I use the pieces as a template for a rebuild.
As part of the casting deck I eliminated the bottom panels from the console to keep the under deck storage wide open.
CASTING DECK
I used 3/8 sapele marine ply for the rest of the wood. Most of it was backed by and epoxied to 2x4's that have dried in my basement for 4 years (they were just sitting there) The deck is very heavy but very sturdy and balances the boat nicely. Everything is epoxy soaked and coated and finished in varnish above deck. I attempted to round all the edges to give it a weathered look, I just hacked it up in some cases and would have been better served leaving everything clean or doing some precision routing instead of sanding (with a grinder...shame on me!).
The 2 panels in front of the console completely remove and I am still on the fence of wether or not to hinge them, they are heavy enough and fit tightly enough that they don't move while underway. I like the versatility of not having them anchored. Below deck I have 2 moeller 12 gallon low pro fuel tanks and 2 separate lines/primers/connections to the motor. This hopefully gives me a backup in the case of a pinhole or bad primer bulb in my fuel line and will get me home. Not to mention having to switch tanks at bad times. I have room for up to 4 extra 6 gal tanks should I ever need the capacity. I have a small cooler that fits just below the deck and stores there nicely freeing up deck space. The other thing I really like is that by keeping the console bottom open I can store any rods (or anything for that matter) that are not in use completely out of the way.
Edited by charkbait on 04/10/09 - 7:04 PM |
| |
|
|
| LabCab |
Posted on 04/10/09 - 6:51 PM
|
Member
Personal Page
Posts: 100
Comments:
7
Joined: 01/17/09
|
Is the durabak a custom or standard color? It looks very nice. I'm working on a 13' hull that has lots of old repairs and durabak might be just the ticket.
|
| |
|
|
| charkbait |
Posted on 04/10/09 - 6:56 PM
|
Member
Posts: 82
Comments:
0
Joined: 08/01/08
|
STERN SEAT
I still need a place for passengers to ride and in a whaler there is no place (other then at the helm) to ride then almost right on the stern. The seat serves many duties as storage, a rear casting deck, seat, 11 rod holders...you name it. It does however eat up a lot of rear deck, as it stands now it comes off the motor well about 21 inches, I would keep it to 15 if I had to do again. I may do it this winter, it would be an easy modification.
POWER
I recovered the morse shifter and everything off the old setup for now, I'd like to re-chrome the shifter in the future as it is still in fantastic working condition. I reinstalled the 1988 88SPL on the back but used a jackplate this time to help get into some skinnier water. After much adjustment I only picked up 3 inches of height and may need to go back to a transom mounted motor due to cavitation issues. One thing I didn't think about was I moved the motor back and up, I also moved the console forward and up...guess what? I was about 2' short on my steering cable when I went to reinstall it. On the splash down I ran it above deck but replaced it with a longer one today before snapping pics...there's another $100 you don't account for.
Hope that I gave you guys some ideas, fire away with any questions and I'll do my best to tell you what "I THINK" note that this doesn't mean it is correct.
Thanks for all the help either directly or just from continuing to answer questions and create a nice searchable database for folks like me.
WC is fantastic and I wouldn't have even tried to restore the old girl without finding this place.
Edited by charkbait on 04/10/09 - 7:07 PM |
| |
|
|
| charkbait |
Posted on 04/10/09 - 7:01 PM
|
Member
Posts: 82
Comments:
0
Joined: 08/01/08
|
ioptfm wrote:
WOW! She looks fantastic...............Did you all of the wood yourself? It looks great adn I agree that the rear casting deck not only looks good, but is very practical......Good Job!
Thanks so much, I did do all the wood. I'm no finish carpenter but I restored the console to a serviceable condition and built the rest from sapele ply. 2 coats of epoxy and 4-5 varnish depending on where it was.
|
| |
|
|
| charkbait |
Posted on 04/10/09 - 7:03 PM
|
Member
Posts: 82
Comments:
0
Joined: 08/01/08
|
LabCab wrote:
Is the durabak a custom or standard color? It looks very nice. I'm working on a 13' hull that has lots of old repairs and durabak might be just the ticket.
The durabak is a standard color, they have the color selections on their site, it is either light or medium blue. It will fill and seal a lot of imperfections but like I said I'm not sure how it will hold up over the long haul. It will however save you a TON of time. Check out the link, I have a lot more shots of the durabak.
|
| |
|
|
| charkbait |
Posted on 04/10/09 - 7:16 PM
|
Member
Posts: 82
Comments:
0
Joined: 08/01/08
|
Forgot a few things, I did buy and install:
bow light chock
new rub rail
LED deck lighting (in the stern seat)
All stuff I didn't really plan on doing initially.
The bow light came to pass when I realized the durabak would easily destroy any anchor line that crossed the bow when tied off to the norman pin. The rub rail came to pass (initially wanted to keep the rail durabak) when I struggled to find a better way to wire the bowlight. Everything I came up with was more effort the springing for the rub rail and spending 3 hours to install. The LED (red and white) deck lighting was just in the way as I was going to the checkout. It should prove pretty useful since I do some launches and loading in the dark.
|
| |
|
|
| Gradyman78 |
Posted on 04/20/09 - 4:53 AM
|
Member
Personal Page
Posts: 3
Comments:
0
Joined: 04/18/09
|
I just joined the site on Saturday after bringing home a 1970, 17' Sakonnet. It has the original seat, but not the original console or the decking forward of the console. Did you purchase or build the ones on your boat? If you built them, where did you locate the plans and the material. Also, I am going to be repainting the interior and I would like to match the original blue with preferably a two-part eurethane. Any help you could provide me with would be greatly appreciated.
|
| |
|
|
| charkbait |
Posted on 04/20/09 - 9:53 AM
|
Member
Posts: 82
Comments:
0
Joined: 08/01/08
|
There are plans in the downloads section of this site for the casting deck. I didn't follow the wood selection or the plans.
Hopefully somone can chime in on the paint, I didn't paint.
|
| |
|