|
1990 Outrage 19 Restoration and Repower
|
| NCWhaler |
Posted on 08/12/16 - 3:16 PM
|
Member
Posts: 52
Comments:
0
Joined: 08/10/16
|
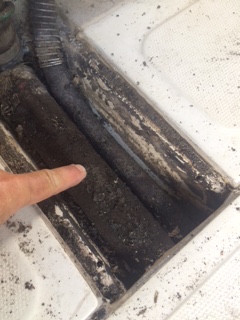
Fortunately I have found almost no rot thus far, here is a small area under one of the rod holders. I'm anxious to see what the condition of the large deck plate is, and to check out the fuel tank. I've seen some nasty gas tanks with leaks into the surrounding foam. Don't want to be running a large Molotov cocktail.
NCWhaler attached the following image:
[33.24Kb]
|
| |
|
|
| NCWhaler |
Posted on 08/12/16 - 3:17 PM
|
Member
Posts: 52
Comments:
0
Joined: 08/10/16
|
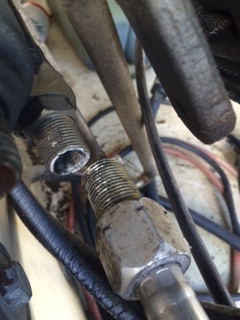
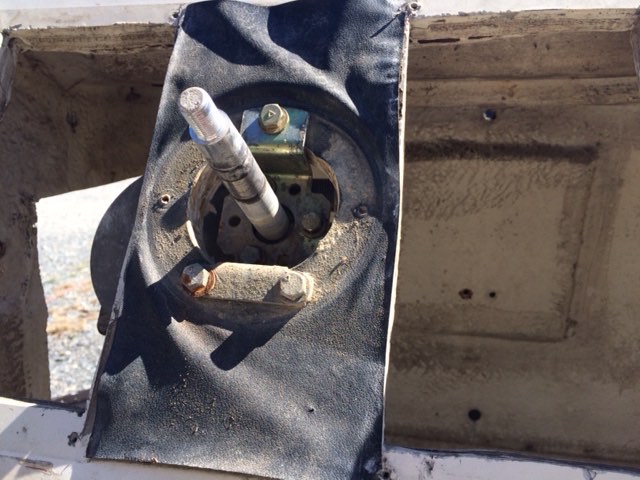
This is a close up of the steering tube that cracked when I put a wrench on the large nut, salt water is not your friend:
NCWhaler attached the following image:
[43.67Kb]
|
| |
|
|
| NCWhaler |
Posted on 08/12/16 - 3:19 PM
|
Member
Posts: 52
Comments:
0
Joined: 08/10/16
|
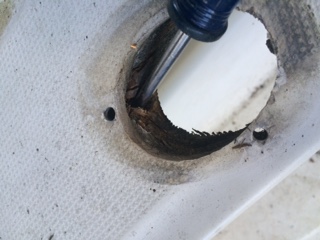
Yucky vinyl stripe on the console, I used to take these off with a heat gun (1200 degrees) and a blunt chisel. Tedious and if the chisel gets to hot it can damage the gelcoat. Using a razor blade just about guarantees damage to the gelcoat.
NCWhaler attached the following image:
[32.15Kb]
|
| |
|
|
| NCWhaler |
Posted on 08/12/16 - 3:21 PM
|
Member
Posts: 52
Comments:
0
Joined: 08/10/16
|
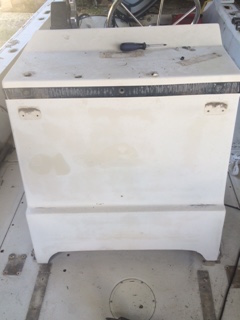
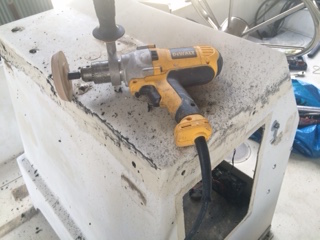
A 'Smart Eraser' wheel (knock off of the much more expensive Whizzie Wheel) took the stripe off in six minutes when mounted on a 1/2 inch drill. I was going for speed and got it a little too hot and melted some of the stripe, but it will come off easily when I start sanding.
NCWhaler attached the following image:
[41.73Kb]
|
| |
|
|
| NCWhaler |
Posted on 08/12/16 - 3:24 PM
|
Member
Posts: 52
Comments:
0
Joined: 08/10/16
|
Whew, getting below the inspection plate makes me feel like an archeologist! Yuk. The large fuel line going into the tank from the filler is a little dry rotted, but nice to see BW double clamped the hose. Dang ethanol fuel has made farmers wealthier but cost boaters billions in repairs. I can say this as I own a farm ha. Not long ago I found the ventilation line on a boat had corroded and broken right off releasing the fumes into the hull. Mine looks pretty good.
NCWhaler attached the following image:
[43.83Kb]
Edited by NCWhaler on 08/12/16 - 3:27 PM |
| |
|
|
| porthole2 |
Posted on 08/14/16 - 6:18 AM
|
Member
Personal Page
Posts: 72
Comments:
1
Joined: 10/28/05
|
NCWhaler wrote:
Yucky vinyl stripe on the console, I used to take these off with a heat gun (1200 degrees) and a blunt chisel. Tedious and if the chisel gets to hot it can damage the gelcoat. Using a razor blade just about guarantees damage to the gelcoat.
When I use a razor blade on gelcoat I burnish it first.
I use a solid handle for the blade, either a screwdriver type or typical blade holder. I then drag the blade backwards across the gel coat (inconspicuous area) a few times to take the really sharp edge off. I will also tweak the blade a bit a few times on each corner as I drag it backwards.
This really minimizes any gel coat gouging, and of course, technique is key.
Thanks, Duane |
| |
|
|
| NCWhaler |
Posted on 08/18/16 - 5:48 PM
|
Member
Posts: 52
Comments:
0
Joined: 08/10/16
|
Did a little more work today, got the binnacle off which was a real PITA due to stainless screws seizing to the crappy metal Yamaha used for the mount under the plastic housing. Anyone taking a Yamaha 704 binnacle remote control off would be well advised to watch a video to see how to do it, especially the nearly invisible little detents on the side. It took an hour or more and I had to drill several of the screws out but I saved the two cables and I think the binnacle is still usable. One of of the two mounts to the console was trashed however.
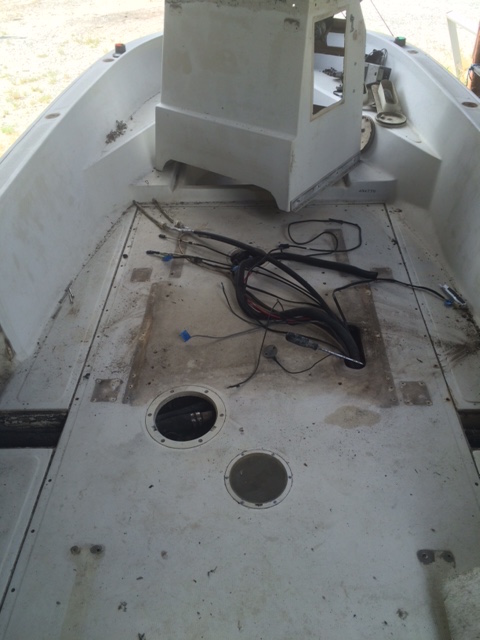
With the binnacle off I removed the console and found a half dozen more huge screws holding the deck down. They were removed and a razor knife cut through the thick silicone sealant between the deck seams. The deck came up pretty easily with one person after that (make sure you get all the screws out!) and was as solid as a granite slab with almost no rot except in the area around the tunnel hole which was reinforced with two layers of plywood and three layers of thick fiberglass!
OK, the gas tank is huge! It runs the entire length of the floor and seems to be in good condition. I'm going to do some research into how to tell for sure, and maybe cut some inspection/cleaning holes into the tank. If anyone has done this let me know!
NCWhaler attached the following image:
[99.6Kb]
|
| |
|
|
| NCWhaler |
Posted on 08/18/16 - 5:50 PM
|
Member
Posts: 52
Comments:
0
Joined: 08/10/16
|
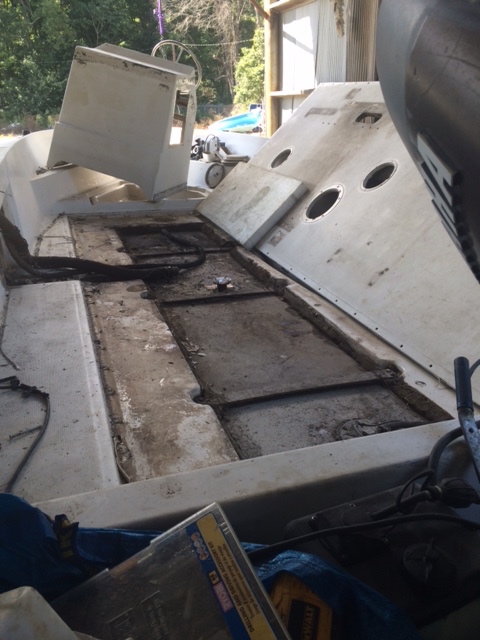
Three hours today, 11 total. Deck off to expose the gas tank, which looks dirty but the foam seems dry and there is not a lot of corrosion, I will try to remember to get a few more pictures of the layout below the deck once I get the granite slab off the boat:
NCWhaler attached the following image:
[118.71Kb]
Edited by NCWhaler on 08/18/16 - 6:01 PM |
| |
|
|
| NCWhaler |
Posted on 08/18/16 - 6:03 PM
|
Member
Posts: 52
Comments:
0
Joined: 08/10/16
|
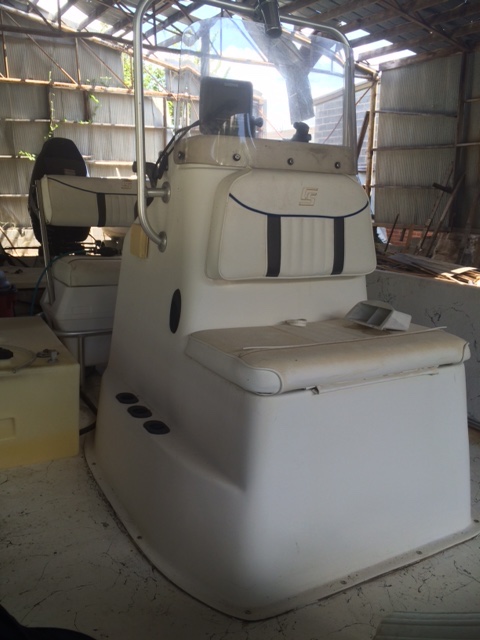
This is the console presently on the CS 24 with the Suzuki. Compare to the console in post #23, I think this rounded one is a little sexier and has the advantage of being somewhat narrower along with having a built in seat.
NCWhaler attached the following image:
[91.7Kb]
|
| |
|
|
| NCWhaler |
Posted on 08/26/16 - 7:00 PM
|
Member
Posts: 52
Comments:
0
Joined: 08/10/16
|
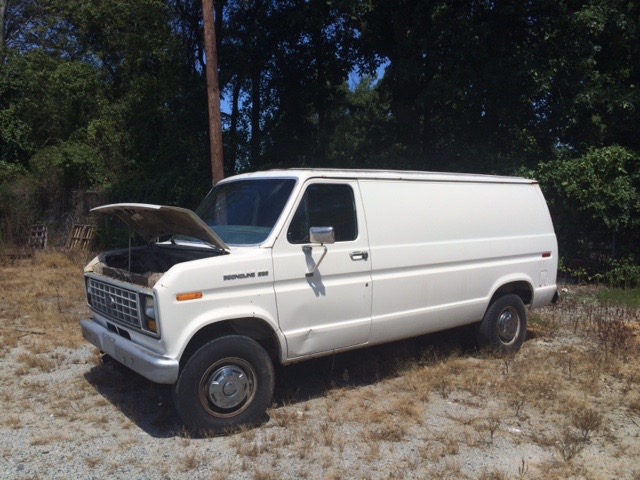
This project is coming along slowly as I am working on other projects at the same time. I am ready to take the motor off, and plan to do this by throwing a come-along over a huge beam in the boat shed, the Yamaha has a lifting bolt already installed. Once I get it off it will be put on a stand made on top of a strong pallet I can move around with a fork lift.
I'm still thinking about the fuel tank situation, and how to deal with the non-skid. I think I will just mask the non-skid off and gelcoat the rest of the boat and keep the original non-skid which is not very toothy at this point. I guess I am going to keep the original console instead of going custom, the boxy lines go well with my new acquisition below.
One of the projects slowing me down is due to SWMBO requesting me to get another tow vehicle instead of using the family SUV (and getting it dirty.) So I've been looking for a cargo van to turn into a weekend camper/toy hauler and finally found one a few days ago that will make a good project and it was also cheap.
1987 Ford Econoline e250 in running condition with 184K miles. $900. With a little TLC it will be perfect for dragging the Whaler up and down the east coast on fishing and boating adventures. By a little TLC I mean dent and rust removal, upgraded seats, complete redo of the interior with beds along the side that fold up allowing a motorcycle to be carried in the cargo area, tuneup, solar panel/inverter, 12V fridge, new tires, new paint etc. The paint will match the Whaler of course. When I get done I will have $4000 without labor in a van still worth only $1500 ha.
With this van, maybe I should name the boat "Free Candy."
NCWhaler attached the following image:
[115.63Kb]
Edited by NCWhaler on 08/26/16 - 7:14 PM |
| |
|
|
| NCWhaler |
Posted on 10/16/16 - 8:43 AM
|
Member
Posts: 52
Comments:
0
Joined: 08/10/16
|
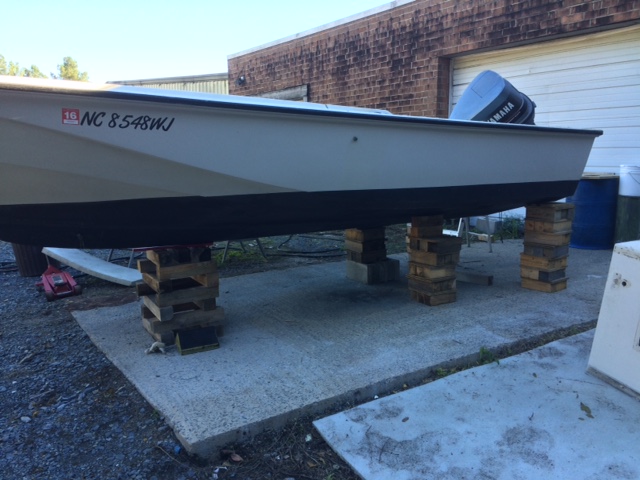
The next step was to take the 19 off its trailer and block it up. This will give me a chance to work on the trailer without the boat in the way and to work on the boat without the trailer in the way or getting covered in gelcoat etc. Blocking up a boat is dangerous business. Do not trust your blocking unless you have at least 5 blocking points for a 19 foot boat. A level concrete pad is excellent for stability and to keep dirt out of your work. My pad is somewhat elevated which is a PITA, as when the trailer is pulled away it kicks the rear end of the trailer up requiring the boat to be relatively high in the air until the trailer is completely removed. Thankfully I have a fork lift to aid in the process, and don't mind touching up the nicks the forks put in the gelcoat as the boat shifts. A full inversion gantry is in the planning stages when I have time to weld one up. Piling "cut offs" are great for blocking if you live near the beach, and are strong and stable if cut off squarely. Cement blocks are terrible, do not trust them for anything larger than a BW13 as they will suddenly fail, especially if placed on their sides as they are stronger with the holes pointing vertically. Solid wood is best.
If you use a bottle jack, make sure you put a wooden plate between the ram and the hull to avoid holing or cracking your hull. Lower the trailer tongue, then block up the stern of the boat first, and gradually pull the trailer out as you build more block piles to elevate the bow, allowing the trailer to "catch" the boat if your blocking falls over when you move the trailer past each obstacle. It will happen eventually, usually due to the boat rubbing on a bunk and pulling a block forward. If a block pile is tilted, jack up the boat and get it straight before proceeding. Do not use the bow or stern eyes to lift the boat, they are not made for that. As a side note, Boston Whalers are designed to have most of their weight on the keel of the boat when they are stored or on a trailer, so a couple of piles of blocks under the keel is a good idea. Therefore if you have a trailer with only bunks or wobble rollers, consider adding central keel rollers to support most of the weight.
Blocking in progress below: the middle blocks will be shifted forward and a midline stern block added. I am trying to decide if I am going to remove the bottom paint and replace it with new gelcoat. I don't live at the beach anymore, and the last time I left my BW13 in the water for a few weeks it got so dirty and covered in salt I regretted not pulling it out of the water. Plus, it looked SO much prettier without the bottom paint. There are several coats of bottom paint on the boat, and it will take a good 10 days to sand the paint off and put new matching gelcoat on.
NCWhaler attached the following image:
[111.15Kb]
Edited by NCWhaler on 10/16/16 - 9:15 AM |
| |
|
|
| NCWhaler |
Posted on 10/18/16 - 5:54 AM
|
Member
Posts: 52
Comments:
0
Joined: 08/10/16
|
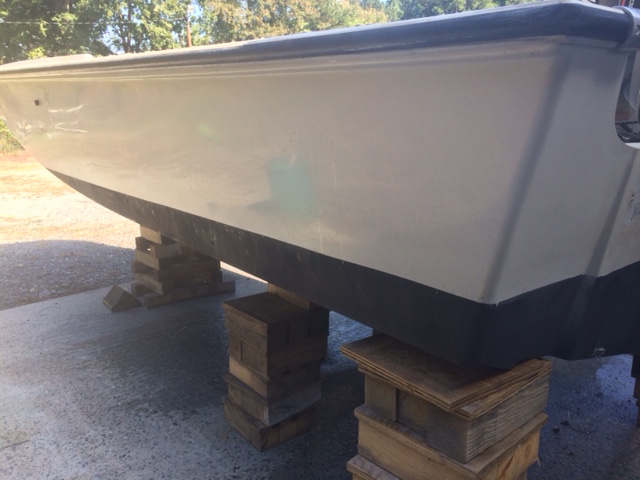
Yesterday I decided to take the bottom paint off the boat. This is one of my least favorite jobs, mainly due to the dust it generates- dust that gets under your fingernails and every other nook and cranny within 50 feet. It is possible to cut out the dust problem by damp sanding but then you are covered in wet muddy dust splatters and usually end up lying in dampness under the boat. A full face respirator and tyvek suit is almost mandatory for this reason and to protect your health. Hearing protection isn't a bad idea either, and helps to keep dust out of your ears despite wearing a hood.
This and the following post shows what you can get done in one hour on a flat surface. Of course, the bottom is not a flat surface and one has to be very careful around chines and even rounded areas to keep from zipping right through the full thickness of gelcoat.
Start photo: (maybe someone can PM as to how to put two photos in a single post)
NCWhaler attached the following image:
[99.93Kb]
|
| |
|
|
| NCWhaler |
Posted on 10/18/16 - 6:00 AM
|
Member
Posts: 52
Comments:
0
Joined: 08/10/16
|
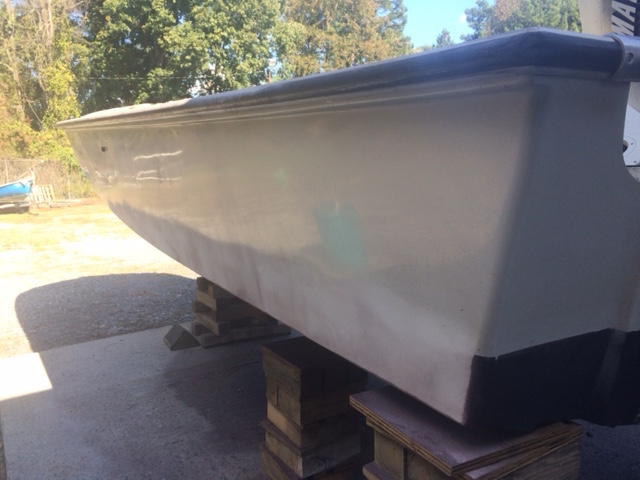
After 30 minutes per side using 40 grit on a Dynabrade DA "air hog" sander (I use a 33 gallon compressor which has a hard time keeping up with the air demand) I got one side done, both sides without the transom took one hour. There were two coats of bottom paint on the boat (black over brick red) and both coats of paint were fairly thin and soft. The job is worse if there is more buildup of coats or if rock hard non-ablative paint has been applied. If the paint has a "smooth" feel it is likely ablative, where coarse textured dried-out looking paint may be much harder. Ablative paint gets smoother with use, non-ablative does not.
NCWhaler attached the following image:
[104.03Kb]
|
| |
|
|
| NCWhaler |
Posted on 10/18/16 - 6:09 AM
|
Member
Posts: 52
Comments:
0
Joined: 08/10/16
|
This is a medium action Dynabrade DA sander. The action refers to the size of the orbital motion, in this case 3/8 of an inch. They cost about $150 vs $50 for a cheaper model at Harbor Freight, which will choke on its own dust after a short time. I've done about five bottoms this year with this tool and it has a lifetime guarantee, well worth the money. It is imperative to oil the tool with each use when sanding gelcoat and bottom paint. Compared to using a regular orbital sander, there is no comparison in the end result- it causes almost no divoting when held flat and is easy to feather an edge. I would estimate that it cuts the time and effort to do a job vs hand sanding by a factor of six. Around chines or other sharp transitions I recommend placing protective tape as gelcoat is thin in these areas and any tool- even a hand block can sand the gel completely off down to the laminate in short order.
NCWhaler attached the following image:
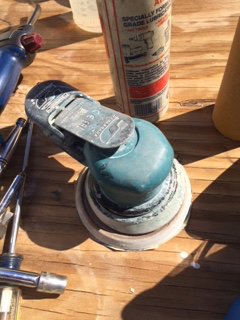
[98.32Kb]
Edited by NCWhaler on 10/18/16 - 6:14 AM |
| |
|
|
| NCWhaler |
Posted on 10/18/16 - 6:18 AM
|
Member
Posts: 52
Comments:
0
Joined: 08/10/16
|
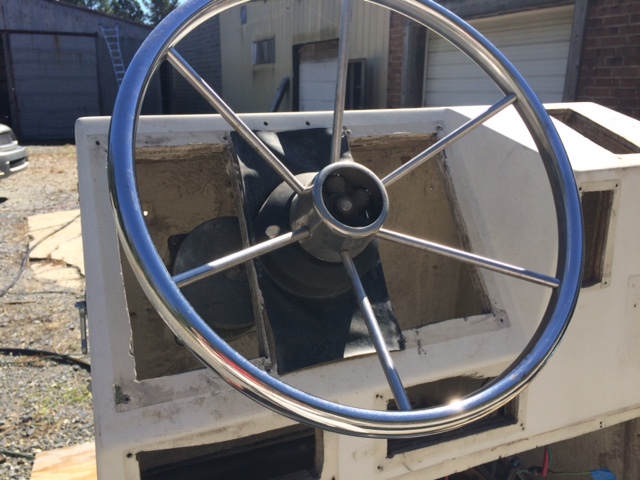
Taking the helm apart: first pop off the center trim piece from the destroyer wheel
NCWhaler attached the following image:
[115.38Kb]
|
| |
|
|
| NCWhaler |
Posted on 10/18/16 - 6:21 AM
|
Member
Posts: 52
Comments:
0
Joined: 08/10/16
|
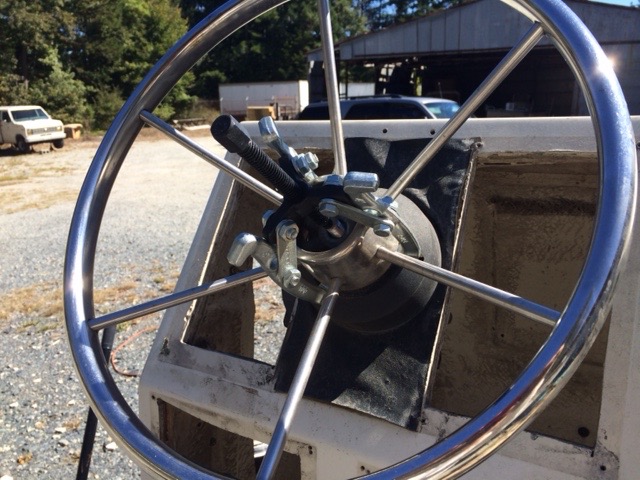
Next remove the large nut holding the wheel on which forces it down onto the tapered shaft. A cheap gear puller from Amazon will help to get the wheel off the shaft if it has been jammed hard onto the shaft or suffers from salt water corrosion.
NCWhaler attached the following image:
[119.68Kb]
|
| |
|
|
| NCWhaler |
Posted on 10/18/16 - 6:25 AM
|
Member
Posts: 52
Comments:
0
Joined: 08/10/16
|
There is a Woodruff key that needs to be tapped out, this is what actually makes the wheel turn the shaft without slipping, not the nut. It is usually corroded from dissimilar metals galvanic corrosion.
NCWhaler attached the following image:
[120.24Kb]
|
| |
|
|
| NCWhaler |
Posted on 10/18/16 - 6:29 AM
|
Member
Posts: 52
Comments:
0
Joined: 08/10/16
|
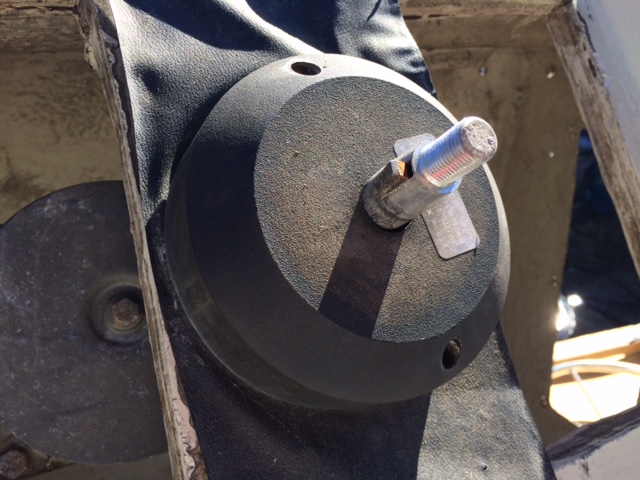
Then the bracket bolts are removed and the helm can be taken out. If your helm feels wobbly, these brackets may have rusted through, or the wood core holding the bolts may have gotten some rot from water penetration. The wood core on my BW had sealed edges and the general construction is quite robust, very solid compared to many consoles. The vinyl trim is tacky though and will be replaced with something else.
NCWhaler attached the following image:
[77.87Kb]
Edited by NCWhaler on 10/18/16 - 6:31 AM |
| |
|
|
| NCWhaler |
Posted on 10/18/16 - 6:34 AM
|
Member
Posts: 52
Comments:
0
Joined: 08/10/16
|
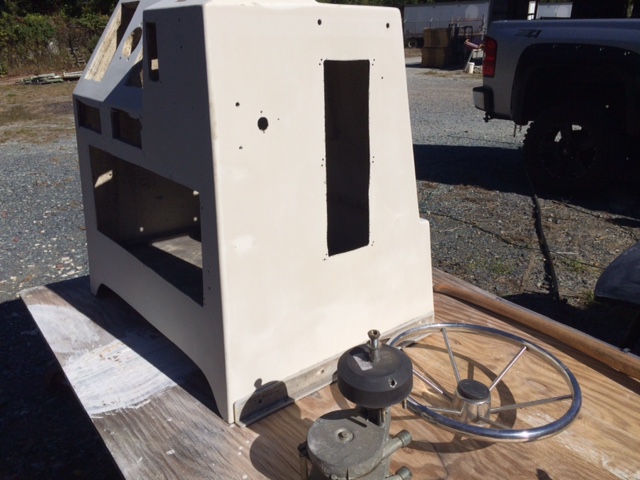
Stripped console. It has upwards of thirty extra unsightly holes that have been drilled into it over the years that will be repaired.
NCWhaler attached the following image:

[100.63Kb]
|
| |
|
|
| NCWhaler |
Posted on 10/18/16 - 6:36 AM
|
Member
Posts: 52
Comments:
0
Joined: 08/10/16
|
After sanding with the Dynabrade DA, 120 grit first pass. Note the edges are not sanded, they will be done by hand with a soft sponge.
NCWhaler attached the following image:
[110.25Kb]
|
| |
|